

 Search
Search
[{{{type}}}] {{{reason}}}
{{/data.error.root_cause}}
{{{_source.title}}} {{#_source.showPrice}} {{{_source.displayPrice}}} {{/_source.showPrice}}
{{#_source.showLink}} {{/_source.showLink}} {{#_source.showDate}}{{{_source.displayDate}}}
{{/_source.showDate}}{{{_source.description}}}
{{#_source.additionalInfo}}{{#_source.additionalFields}} {{#title}} {{{label}}}: {{{title}}} {{/title}} {{/_source.additionalFields}}
{{/_source.additionalInfo}}- Details
- Category: Hardware
-
By Jason Gress
- Hits: 2519
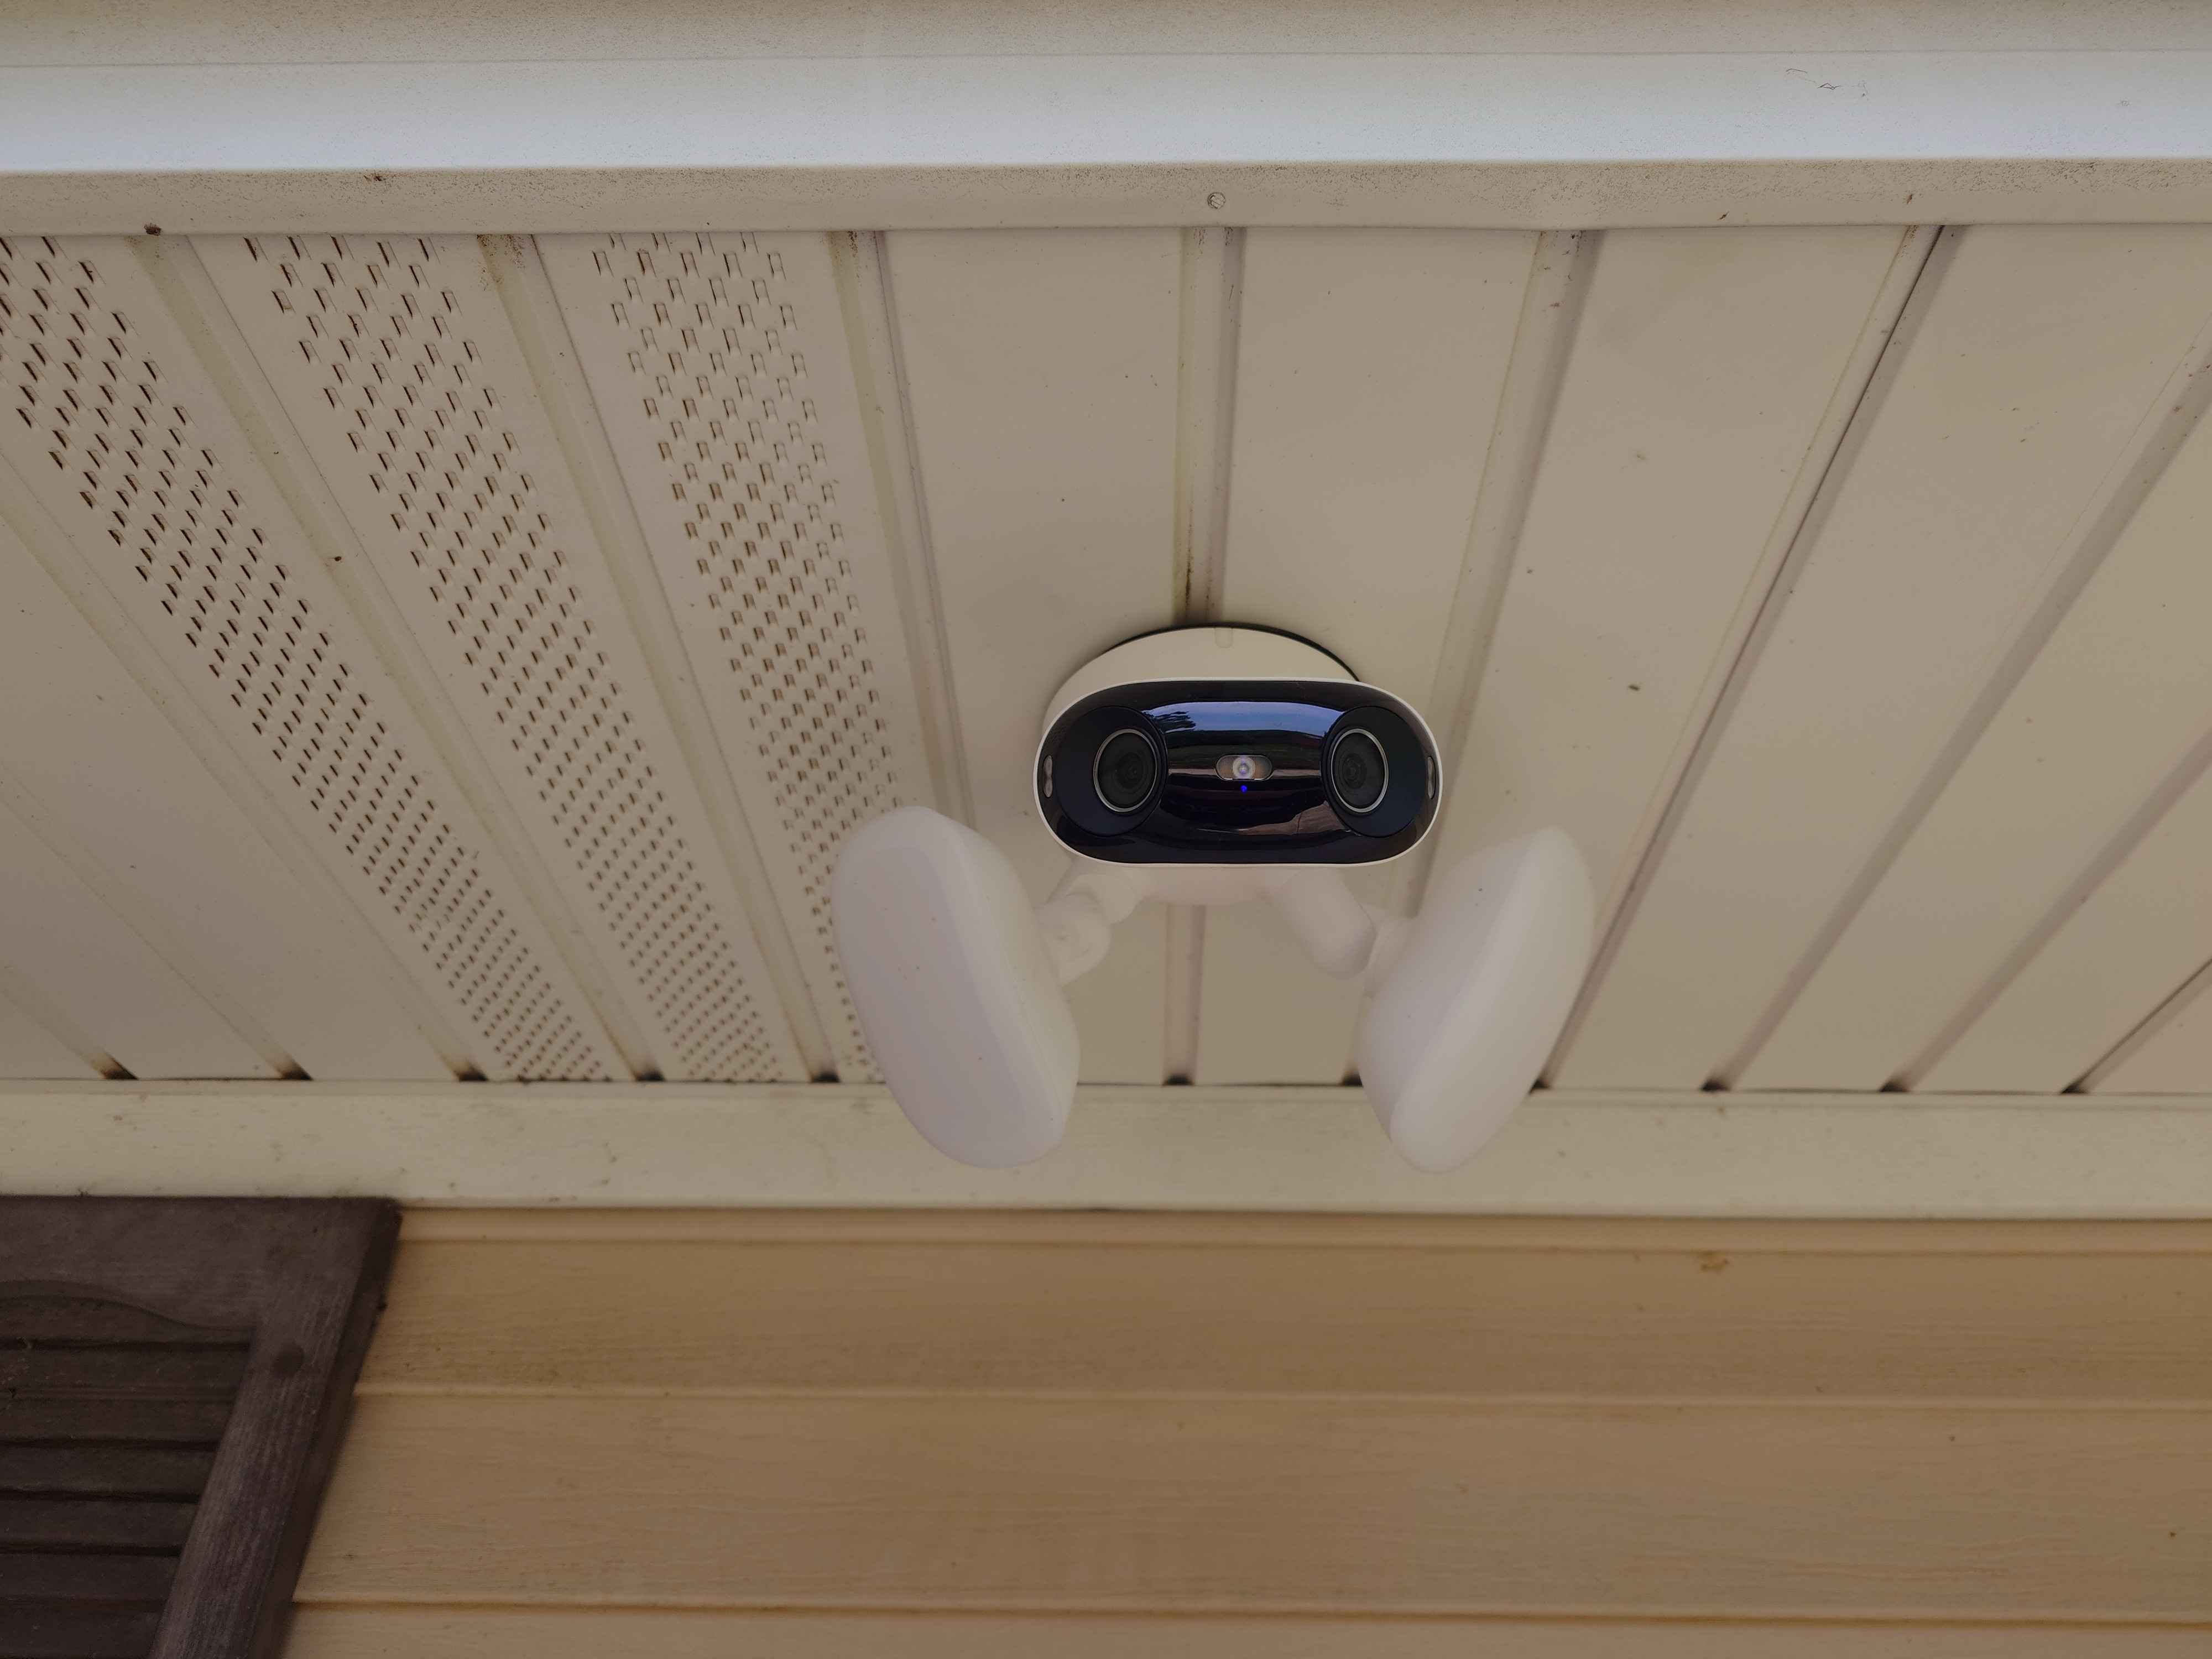
Reolink Elite Floodlight WiFi

Reolink Elite Floodlight WiFi
Built-in Floodlights
1/2.7" CMOS image sensor
5120x1552@20fps resolution
f=2.8mm fixed lens, F=1.6
180 degree horizontal and 59 degree vertical field of view
Black & White or Color night vision
Two-way audio
Hard-wired, direct fixture AC power (no power plug included)
MicroSD card slot with max 512GB card
USB-C port (for setup only)
2.4GHz and 5GHz Wi-Fi 6 with WPA/WPA2/WPA3 security support
Bluetooth 5.0
Windows, macOS, Android, and iOS support
Full recording with motion detection
Operating temperature: 14F-131F
Weatherproof with IP66 rating
Weighs 1321g
2-year limited warranty
MSRP: $219.99
(Amazon Affiliate Link)
Thank you Reolink for sending us this floodlight camera to review!
Last year I reviewed the excellent Reolink Argus 4 Pro Camera + Solar Panel that started my journey with Reolink's products. Earlier this year, I was blessed to be able to review the Home Hub, which is a centralized way to manage their cameras. Unlike those devices, which are mostly self-contained and easy to setup, this Floodlight Elite WiFi is designed for permanent mounting.
Essentially, it can be mounted anywhere an electrical box is available. This could theoretically be indoors, if you wanted to replace a room light with a camera + floodlight, but realistically it's meant to replace an existing outside light. It is designed for ceiling/overhang or wall mounting. In my case, I decided the easiest place to install it would be to replace the motion-activated light right by the front door. This light is connected to an internally-switched outlet, so I bought an inexpensive light switch blocker so I couldn't accidentally turn it off.
As someone who has replaced outlets and light switches before and understands how to enable or disable power via my breaker box, I found the installation quite straightforward and not too difficult. Before I began, I turned off the switch that controls the power to that outside light. I know I should have shut off the breaker as well for double protection, but thankfully no one turned on that outside light while we were working. I did this during a bright, sunny day.
Then, my son and I grabbed a ladder and some tools, and we began removing the old light from the external soffit overhang. We had to unscrew a couple of screws to lower the existing lamp from the soffit, unveiling an adapter plate with a standard square junction box underneath. Three wires were also exposed, which connected to the old light.
Since the wires were not live, we then removed the adapter plate and untwisted the wire caps which tied them together. There were three colors: white, black, and in my case, brown for ground. Once separated, I was able to entirely remove the old light fixture.
Before the next step, I connected the Elite Floodlight's camera module to a USB-C 5V20W DC adapter, so I could pair and connect it to the Reolink app. I already had the app installed and configured because I reviewed the previous products, so it was easy. I connected it to my Home Hub, which makes centralized configuration and viewing multiple cameras much easier.
Next, we followed the provided installation instructions on the Reolink app. They include step-by-step instructions, like attaching the mounting plate to the junction box. I was instructed to install the base bracket onto the mounting plate, while carefully feeding the wires into the opening. This actually took me a couple of tries since I had it on backwards at first, but it wasn't too bad.
Then you lift up and connect the Reolink to the mains power. I used the included wire caps, and twisted together the white, black, and ground wires. In this case, the ground wire from the Reolink's side is green, while it was brown in my installation. Once all connected, you then attach the Elite Floodlight to the mounting plate with the two included screws, then use the silicone plugs to waterproof everything. That's it for mounting it!
With all of that said, if you do not feel comfortable following those kinds of directions, or if there is a chance that the wiring uses different colors or is so old that standards likely changed since the house was wired, then call an electrician to install it. Safety is of the utmost importance after all.
Strong Points: Mounting process is fairly simple; very good video quality; nighttime video looks great; floodlights work well; nice feature set on the Android and Windows apps I tested; includes common mounting hardware, including spare parts; seems solidly built; no monthly fees required at all for viewing at home or away
Weak Points: Doesn't integrate into standalone security systems without the Home Hub or Reolink NVR which are separate purchases
One great benefit of having a hard-wired camera light like this is that is can not only replace the functionality of an old standalone light fixture, but because it's WiFi, once it's connected and associated with your app (or Home Hub), that's all you need to get it working. While I would love it if I had an Ethernet wire ran through my attic into that light fixture, and perhaps that could happen someday, that day isn't today. Every day I can avoid another journey through my attic is a good day, so connecting it over WiFi is quite the blessing in this case.
Once I had it all connected and working, it just acted like a better and more reliable Argus 4 Pro. The camera module looks the same from the outside, but it turns out that it has a slight spec bump, including a slightly taller viewable area, which made a notable difference in my case. Because of this, I was able to get a solid view of my front door, a bit past my mailbox, and past my driveway so I could see everything I wanted to in the frame. It also offers a better frame rate of 20 vs 15, though that is not quite as big of a deal as seeing a bit more of the space around my house.
Another important benefit might be rather obvious, but I can keep a window on my computer of the camera running at all times, and I don't have to worry about draining the battery. The Argus 4 Pro gets fantastic battery life, and it's even better with that solar panel, but nothing beats mains power. I happen to have a whole-house generator, so even in the event of a power outage, my camera's feed should only be interrupted for a short time once the generator kicks on and the camera boots back up.
The Argus 4 Pro was touted as having excellent dark performance, and I'm sure that's still the case with this Elite Floodlight WiFi. I already have lights over my garage, and with this floodlight, there is always some light available. I have it set to Auto, and with that setting, it's off during the day, and dimly lit at night. You can put the floodlights on a timer, force them off, or have them turn on only in Night Mode. Since I have that bright garage light, if I used that last setting the camera never turns on the floodlights. I chose Auto mode because it instead turns on a dim light that makes the front door safer without being so bright that it's a problem. I do wish there was a motion sensing mode for turning on the lights, though.
Generally, the floodlight along with Auto mode has been a great set and forget setting, since the lights shut off when the sun comes up. However, on rare occasions, I have seen the lights flash on and off suddenly, and seemingly without explanation. If I ever figure out what is triggering this, I'll update to let you know. It is pretty rare though, and mainly overnight, so I don't see it. The only time I saw it happen was after accidentally power cycling the camera (before I had switch blocker in). However, looking over past camera footage, I have seen it happen on occasion.
Just like other Reolink products, there is no subscription or any additional fees unless you sign up for Cloud storage. And with microSD card support onboard or using the Home Hub, I really see no need for that. All of the existing features, like optional data storage encryption, optional notifications, email alerts, FTP uploads, and so on are still available.
In my experience testing the notifications support, I found it to be far more reliable than before. This is especially true with car and moving object detection. This is likely because the camera is always on and at full-blast, rather than being forced to sleep to remain in a sleep/low power mode like on the battery-powered Argus 4 Pro. Of course you can adjust detection sensitivity, but coming from the battery-powered model, my expectations were surpassed quite a bit given the behavior before.
Most administration is done with the same Reolink app as all other modern Reolink products. They offer a Windows, macOS, Android, and iOS version. Most of my testing was done with the Android app, along with the Windows one. I was also able to access the live feed and video recordings from the Home Hub web interface from my Linux desktop machine.
Some of the features and options are slightly different since the Home Hub is managing my cameras. There is a new beta Local AI Video Search feature that honestly seems really great, but it does not yet support Home Hub connections. Since I don't have a spare microSD card to test the camera outside of using the Home Hub, I wasn't able to test this feature yet. I really look forward to this coming out of beta and being supported via the Home Hub, since being able to search for videos via text prompts sound really amazing. Imaging being able to find all delivery people or trucks from just a text prompt! Until that happens, I'm still quite pleased with the feature set available. Currently, that beta AI search is only available from cameras directly connected to the app and those managed by Reolink's high-end NVR systems.
If you are security conscious and don't want to let the camera's data leave your network, there is a way to do this if you have the right router. In my case I have an Asus router, and with those you can block internet access for any device with a simple click in the router's interface. I tested this, and I was able to confirm that I could access the camera just fine from the house, but as soon as I was on mobile data, I could no longer access it. If you have the right setup but are concerned about privacy, this could be a great way to mitigate any privacy risks while still taking advantage of its wireless and easy to set up nature. Of course, if you don't have the right router or hardware, this might not be an option for you, so plan accordingly. With the Home Hub setup like I have, you would need to block the Home Hub itself, but if you use the camera connected to your WiFi, then you would need to block the camera.
If you don't have the Home Hub, the setup process is quite similar to the Reolink Argus 4 Pro. The camera can be accessed from within your home via your local network or from outside of your house as long as you paired the camera to your phone first. When you set it up for the first time you connect via Bluetooth, but after that it's mostly via WiFi as far as I can tell. You set an administrator password that prevents someone else from trying to take over your camera without permission. I don't believe setting up the camera is possible without a mobile phone, but I could be wrong. The Android app is snappy and responds well, and I have been extremely happy with it.
Thankfully, despite the floodlight being the most prominent aspect of the product's name, the camera picture quality is excellent. It can see very clearly in the daytime, and at night it gets a remarkably clear picture as well. If you have absolutely no light, the camera can use infrared that it emits to then offer a usable black and white picture, even with the floodlights shut off. If you shut off all light, including the invisible (to humans) infrared, then the camera might have trouble. Thankfully, there are plenty of ways for this camera to keep things usably bright, what with those powerful floodlights attached to it.
In the app, there is a Clear and Fluent video mode. The Clear is the much higher native resolution 5120x1552, which is slightly taller than the Argus 4 Pro's 5120x1440 resolution. The Fluent uses a much lower 1920x576 resolution. Unless you have poor WiFi reception, or are traveling and have a slow internet connection on your mobile phone, I see no reason to use Fluent mode. The camera offers 20fps, which is more than enough for a security camera system.
One unexpected but cute feature is that not only does the camera offer audio along with its video recording (it's a setting, I had to turn it on), but it has a speaker so you can talk over an intercom. It's not super loud, so carrying on a conversation might not be fun, but it does work in a pinch and is a nice to have feature.
One thing I noticed in the specifications sheet is that the camera is rated for a temperature range of -10C to 55C (14F - 131F). In my area of the country, the winter months can definitely get below 14F. I am not worried about it, really, as the Argus 4 Pro survived the winter just fine. But it's worth noting in case we get another deep cold spell next winter.
The Reolink Elite Floodlight WiFi is a solidly-built Wi-Fi camera that has a great feature set and excellent performance. Hard-wiring it into my house was really easy, and never worrying about battery life is awesome. The Android app is quite good, as is Home Hub integration. The optional features like notifications or alarms on activation are also a nice touch. I look forward to checking out the new AI search; hopefully that comes to the Home Hub users soon! Being AC powered, you can use this camera in a high-traffic area without issue, or even monitor it all day or night if you want to. I do wish the floodlight had a motion-sensitive mode for when guests come up to my door at night, but other than that I have no real complaints. If you want to retain control of your recordings via microSD card or Home Hub, or if you simply want an excellent-performing camera, then I highly recommend checking out this Reolink. As my third product review from them, I've really come to like what they have on offer, and this is certainly no exception. It's been really reliable and a joy to use. I strongly recommend it if you want to retain control over your video content, while being able to access your camera feeds from anywhere - without any monthly fees, ever.
You May Also Like
Write for us!

Follow Us on X
Watch our next stream!

Allkeys

Save 2% with code CCGR
Follow Us!
![]()
![]()
![]()
![]()
![]()
![]()
![]()
![]()
![]()
![]()
-
Verse of the Day - Joshua 1:9
Have not I commanded you? Be strong and courageous. Do not
...
Donate
Please consider supporting our efforts. Since we're a 501 C3 Non-Profit organization, your donations are tax deductible.
Join Our Discord

Who's Online
We have 23414 guests and no members online